Change Integration Runtime Key

This blog post provides instructions for changing the key for a self-hosted integration runtime, applicable when connecting an existing client to a new Azure Data Factory or Synapse Analytics. The process begins by opening PowerShell as an Administrator and setting the execution policy to unrestricted. After pressing enter, navigate to the Microsoft Integration Runtime directory and execute the RegisterIntegrationRuntime.ps1 script with the new integration runtime key. Upon successful registration, verify the integration runtime status in the Data Factory. To complete the process, restore the execution policy to restricted and exit PowerShell. This procedure ensures the client is properly linked to the new data management service.

  1. Open PowerShell as an Administrator.
  2. Type Set-ExecutionPolicy Unrestricted.
  3. Press Enter.
  4. Go to “C:\Program Files\Microsoft Integration Runtime\3.0\PowerShellScript\RegisterIntegrationRuntime.ps1”
  5. Execute command “.\RegisterIntegrationRuntime.ps1 – gatewayKey <Key from new IR>". It should execute with status “Integration Runtime registration is successful!”
  6. Validate Integration runtime status in Data factory
  7. Once finished, type Set-ExecutionPolicy Restricted.
  8. Press Enter.
  9. Type Exit.

Get Azure Key Vault secrets in Fabric pipeline

In this comprehensive guide, we delve into the integration of Fabric Data Factory with Azure Key Vault, emphasizing the streamlined access to Key Vault secrets using service principal authentication.

This blog post provides a detailed walkthrough on configuring web activity with service principal authentication, ensuring secure access to sensitive information stored in Key Vault.

This step-by-step tutorial includes setting up a fabric data factory connection and configuring Web Activity in Azure Data Factory for secure communication with Azure key vault. By prioritizing Azure Data Factory and Key Vault integration, this post aims to equip readers with the knowledge to fortify their cloud data management and security frameworks effectively.

Prerequisites

To get started, you must complete the following prerequisites:

Add a Web activity to a pipeline with UI

To use a Web activity in a pipeline, complete the following steps:

Create the activity

  1. Create a new pipeline in your workspace.
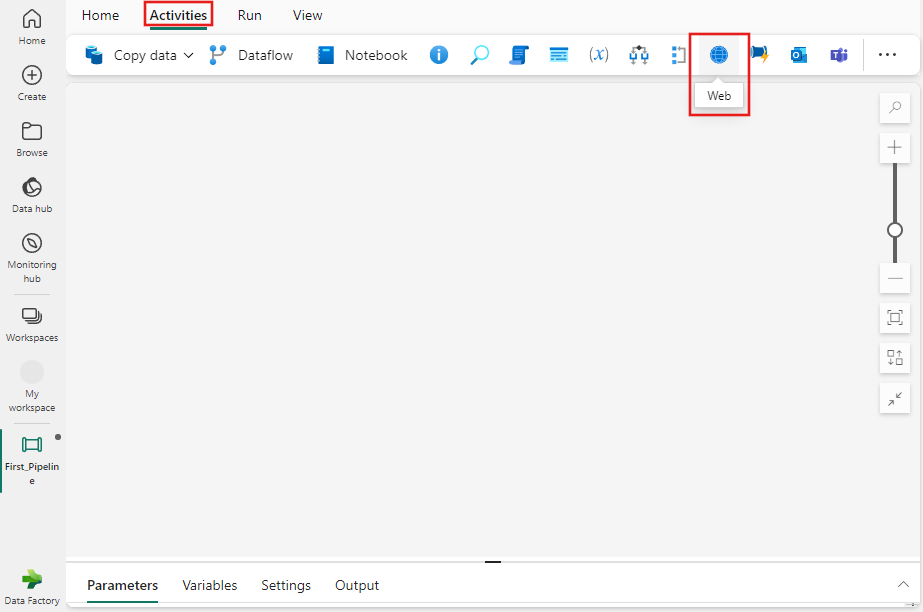
  2. Search for Web in the pipeline Activities pane, and select it to add it to the pipeline canvas.


Web activity settings

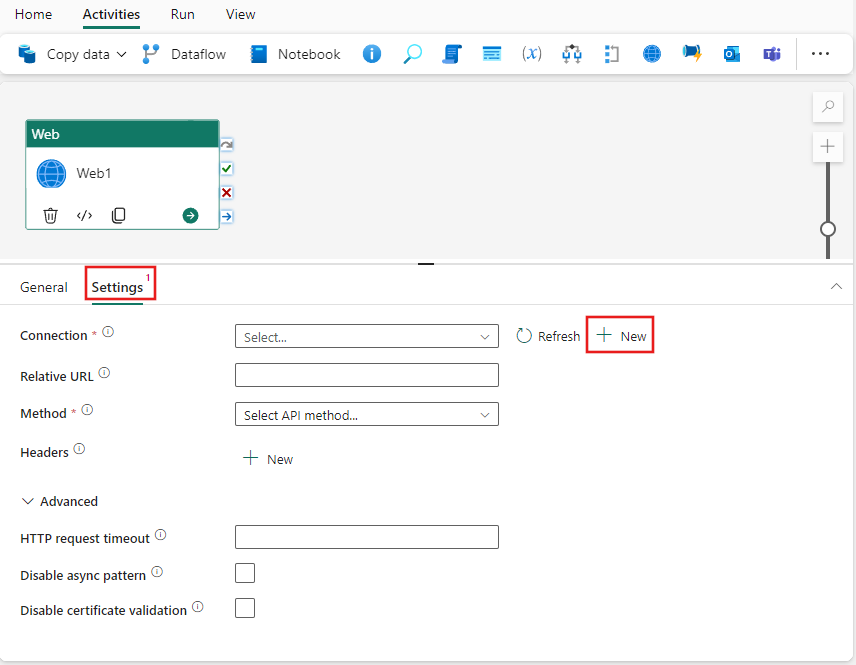
  • Select the Settings tab, select an existing connection from the Connection dropdown, or use the + New button to create a new connection, and specify its configuration details.

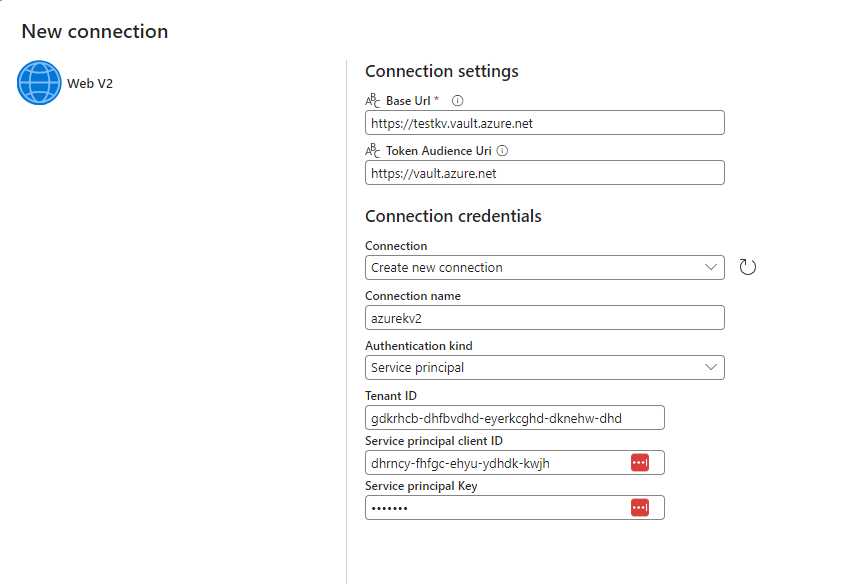
  • When you choose + New to create a new connection, you see the connection creation dialog where you can provide the base URL and credentials to connect.
  • Save connection and add relative secret path and method in web activity settings

Save and run or schedule the pipeline

Synapse Link Spark Pool Issue

Microsoft Azure Synapse Link is a powerful tool that allows you to seamlessly integrate your Azure Synapse Analytics workspace with dataverse. However, like any technology, it can encounter issues during configuration and usage. In this blog post, we’ll address a common problem that users encounter when setting up Synapse Link: tables going into an initial sync and eventually failing, with Spark applications getting canceled. We’ll discuss how to troubleshoot this issue and provide a resolution to get your Synapse Link up and running smoothly.

Problem Statement

After configuring Synapse Link, you may notice that your tables are going through an initial synchronization process, but then they fail. Furthermore, when you check the Synapse monitoring, Spark applications are shown as being in a canceled state, and no logs are created for these jobs. This can be frustrating, but there are reasons behind this issue and steps to resolve it.

Synapse Link Error
Canceled Spark Application

Troubleshoot:

The primary reason for tables failing during the initial sync and Spark applications getting canceled is related to the available resources in your Synapse workspace. Here are some troubleshooting steps to identify the problem

  1. Inadequate Cores: Your Synapse workspace might not have the required number of cores available to process Synapse Link tables effectively. To find out if this is the issue, you can review your Azure Synapse Analytics available cores.
  2. Spark Pool Minimum Requirement: The minimum requirements for a Spark pool in Synapse Link can also lead to this problem. You should check whether your Spark pool configuration meets these requirements.
Minimum requirement for spark pool

Resolution

To resolve the issue and ensure a smooth operation of Synapse Link, you need to make sure that your Synapse workspace has the necessary resources available. Here’s how you can do it:

  1. Spark Cluster Nodes: Synapse Link needs a Spark cluster with 5-10 Spark nodes. If the size of one Spark node is (4 vCores / 32 GB), then your workspace should have 40 total vCores available to process Synapse Link tables effectively. Ensure that your workspace meets this requirement.
  2. Increase Spark Cores: If your Synapse environment falls short of the required number of cores, you can increase the number of Spark cores. To do this, open a support ticket with Microsoft (MSFT) and request an increase in the Spark cores for your environment.

Reference

For more information and detailed recommendations on Spark pool configuration for Azure Synapse Link, you can refer to the official Microsoft documentation here.

Related Synapse Link Issues

Synapse Link Filed to Initialize Storage

Synapse Link Fetching App

Synapse Link Partition Table Issue

Synapse Link failed to initialize storage

Azure Synapse Analytics is a powerful tool for big data and analytics workloads, but like any complex system, it can encounter issues that need troubleshooting. In this blog post, we will discuss a common problem where Synapse Link Delta Tables are not being created in a Synapse Workspace and how to resolve it. We’ll walk you through the symptoms and provide a step-by-step resolution to get your workflow back on track.

Symptoms

  1. Job Status is in a Failed State in Power Platform: When you’re trying to create Delta Tables in your Synapse Workspace, one of the first symptoms you might encounter is job failures in Power Platform. This is a clear indication that something is not working as expected.
  2. Successful Execution of Spark Application in Synapse Workspace: Oddly, the Spark application itself may run without issues within the Synapse Workspace. This can make the problem seem even more mysterious.
  3. Errors in Spark Application Logs: While the Spark application itself may run successfully, the logs can reveal errors or issues that are preventing the creation of Delta Tables.

Look for the following in the spark application Logs:

ERROR AzureStorageEmitter [SparkObservabilityManager-0]: failed to initialize
com.microsoft.azure.storage.StorageException: Server failed to authenticate the request. Make sure the value of Authorization header is formed correctly including the signature.

Screenshots:

Synapse Link for dataverse
Spark application logs

Resolution

To resolve the issue of Delta Tables not being created in your Synapse Workspace, follow these steps:

  1. Go to Synapse Studio: Open Synapse Studio, which is your gateway to managing and monitoring your Synapse Analytics workloads.
  2. Open Linked Services: Under the “Manage” section in Synapse Studio, find and open “Linked Services.” This is where you can configure the connections and settings required for various services and resources in your Synapse Workspace.
  3. Test “Azure Data Lake Storage Gen2” Linked Service: Look for the “Azure Data Lake Storage Gen2” linked service, which is used by both Synapse Link and Synapse Studio. This is a critical component, and any issues with this connection can disrupt your Delta Table creation process.
  4. Ensure Successful Connection: Test the connection to the “Azure Data Lake Storage Gen2” linked service. It should be able to connect to your storage successfully. If the test fails, you need to correct the linked service connection. This might involve verifying your access credentials, permissions, or network configurations.
  5. Verify Synapse Link: After successfully establishing a connection with the Azure Data Lake Storage Gen2, verify that your Synapse Link is correctly set up and configured. This link should now be able to create Delta Tables in your Synapse Studio Data Lake after resolving any issues with the linked service.

By following these steps, you should be able to identify and resolve the issues preventing the creation of Delta Tables in your Azure Synapse Workspace. Ensuring that your connections and configurations are correct is crucial for the smooth operation of your analytics workflows.

Conclusion

Troubleshooting issues like Delta Table creation in Azure Synapse Workspace can be a challenging task, but with the right approach, you can quickly identify and resolve the problem. By checking and testing your linked services and verifying your Synapse Link configuration, you can get your data workflows back on track and make the most of Azure Synapse Analytics for your big data and analytics needs. If you encounter further issues, don’t hesitate to reach out to Azure support for additional assistance.

Other Synapse link issues:

Synapse link stuck at fetching app

Reference: Configure Synapse Link for Dataverse

Synapse Link Stuck at Fetching App

In this blog post, we will address a common issue with Synapse Link, where it gets stuck at “Fetching App.” We will provide a step-by-step guide on how to troubleshoot and resolve this problem.

Issue:

Synapse Link Stuck at Fetching App

Fetching App

Troubleshoot

If you encounter the issue of Synapse Link being stuck at “Fetching App,” follow these troubleshooting steps:

  1. Set Up a New Link from make.powerapps.com:
    • Head to make.powerapps.com.
    • Create new synapse link
    • Select your Synapse workspace and storage
  2. Select Required Tables for Syncing:
    • Choose the tables that you want to sync.
  3. Enable Developer Tools in Your Browser:
    • Press F12 to open the developer tools.
    • Navigate to the “Network” tab.
  4. Look for a 404 Error:
    • Select create synapse link after selecting tables
    • While in the network tab, look for a 404 error that matches the following description or states “app not found.” This error indicates that Synapse Link is unable to set up a Service Principal in Azure.

404 error when trying a GET request https://graph.windows.net/myorganization/servicePrincipalsByAppId/12345678-77a4-5874-2365-12345678c89b/objectId?api-version=1.6

Resolution

To resolve this issue, follow these steps

  1. Launch PowerShell as Administrator with Azure Installed:
    • If you don’t have Azure PowerShell installed, you can follow the installation steps here.
  2. Connect to the Tenant:
    • Run the following command: Connect-AzAccount.
    • Ensure you log in with a user who has privileges to create a Service Principal in the tenant, such as a tenant admin or global administrator.
  3. Add the Principal:
    • Run this command: New-AzADServicePrincipal -ApplicationId ‘12345678-77a4-5874-2365-12345678c89b’.
  4. Try Setting up Synapse Link Again:
    • You should now attempt to set up Synapse Link again. Ideally, this should work without any issues.

By following these steps, you should be able to resolve the “Synapse Link Stuck at Fetching App” issue. If you encounter any further issues, don’t hesitate to seek additional support from your Azure administrators or support team.

Reference: Synapse Link Delta Lake Configuration

Related Article:

Synapse Invalid Object Name

Invalid object name ‘dataverse_.dbo.opportunity_partitioned’

In this blog post, we will discuss a common issue encountered when trying to access partitioned tables in Azure Synapse Workspace, specifically those created by ingesting tables from Power Platform through Azure Synapse Link for Dataverse. While the snapshot folder and .csv files are typically generated, users face difficulties in accessing these partitioned tables. The problem is characterized by an error message that reads: “Invalid object name ‘dataverse_********.dbo.opportunity_partitioned’.”

Resolution:

  1. Check if Workspace System Assigned Managed identity has Storage Blob Data Contributor access on the Storage Account.
  2. Create a server-scoped credential on the master database for the storage account and container
  3. Partition table should work after creating server-scoped credentials

USE MASTER
CREATE CREDENTIAL [https://storageaccount.dfs.core.windows.net/container]
WITH IDENTITY=’Managed Identity’

Reference: https://learn.microsoft.com/en-us/azure/synapse-analytics/sql/develop-storage-files-storage-access-control?tabs=shared-access-signature#server-scoped-credential

Work with Binary Data in Synapse Lookup Activity

Introduction:

When working with binary data in Synapse Lookup activity, you may encounter an error message stating that the data type ByteArray is not supported. This limitation can be frustrating, but there is a simple workaround to handle binary data effectively in the Lookup activity. In this blog post, we will explore how to convert ByteArray to NVARCHAR within the Lookup activity and then convert it back to ByteArray for further processing.

Summary:

By default, the Synapse Lookup activity does not support the ByteArray data type, which can lead to errors when working with binary data. However, you can overcome this limitation by converting the ByteArray data to NVARCHAR within the Lookup activity. After performing the lookup, you can convert the NVARCHAR data back to ByteArray for subsequent processing.

Converting ByteArray to NVARCHAR: To convert ByteArray to NVARCHAR within the Lookup activity, you can use the following script:

CONVERT(NVARCHAR(MAX), CONVERT(VARBINARY(MAX), [timestamp]), 1) AS varchartstamp

This script converts the ByteArray column, such as [timestamp], to NVARCHAR using the CONVERT function. The result is stored in the variable varchartstamp.

Converting NVARCHAR back to ByteArray: To convert NVARCHAR back to ByteArray after the Lookup activity, you can use the following script:

CONVERT(timestamp, CONVERT(varBINARY(MAX), @{activity('Lookup1').output.firstRow.varchartstamp}, 2))

This script converts the NVARCHAR variable, varchartstamp, back to ByteArray using the CONVERT function. The result is a ByteArray that can be used for further processing.

Conclusion:

Working with binary data in Synapse Lookup activity can be challenging due to the lack of direct support for the ByteArray data type. However, by leveraging the conversion functions within the Lookup activity, you can easily convert ByteArray to NVARCHAR and vice versa. This enables seamless integration of binary data into your Synapse pipelines, opening up a wide range of possibilities for data processing and transformation.

By implementing these conversion scripts, you can effectively handle binary data in Synapse Lookup activity and achieve your data integration goals. With this workaround, you can overcome the limitations and take full advantage of the power of Synapse Analytics.

Note: Ensure that the appropriate conversions and validations are performed based on your specific requirements and data scenarios

Azure AI Studio

Studio

Azure AI Studio: The Ultimate Platform for Building AI Services

In this blog post, I will summarize the main announcements and features of AI Studio, a new platform that Microsoft unveiled at its Build 2023 keynote. Azure AI Studio is a suite of tools and services that enable developers to build, deploy, and manage AI applications using the power of OpenAI’s GPT-4 model.

Azure AI Studio consists of four components:

  • Azure OpenAI Service: A cloud service that provides access to GPT-4, a large-scale language model that can generate natural language text for various tasks and domains. Developers can use the service to create custom chatbots, content generators, summarizers, and more.
  • Azure Copilot: A feature that allows developers to infuse intelligent chatbots with minimal effort into any application. Copilot leverages GPT-4 and Azure Machine Learning to automatically generate conversational flows, intents, entities, and responses based on the app’s data and domain.
  • Azure Dev Home: A web-based IDE that simplifies the development and testing of AI applications. Dev Home integrates with Azure OpenAI Service and Azure Copilot, as well as other Azure services such as Cognitive Services, Bot Framework, and LUIS. Dev Home also provides code completion, debugging, and deployment features powered by GPT-4.
  • Azure Fabric: A distributed computing platform that enables developers to scale up their AI applications across multiple nodes and regions. Fabric supports various frameworks and languages, such as PyTorch, TensorFlow, C#, and Python. Fabric also provides monitoring, logging, and security features for AI applications.

AI Studio aims to democratize AI technology and make it accessible to organizations of all sizes and industries. Microsoft CEO Satya Nadella said that Azure AI Studio is “the most comprehensive platform for building next-generation AI services” . He also demonstrated some examples of how Azure AI Studio can be used to create innovative solutions for various scenarios, such as healthcare, education, entertainment, and social good.

If you are interested in learning more about Azure AI Studio and how to get started with it, you can visit the official website or watch the recorded sessions from Microsoft Build 2023 .

AI Studio

Microsoft Fabric

Microsoft Fabric

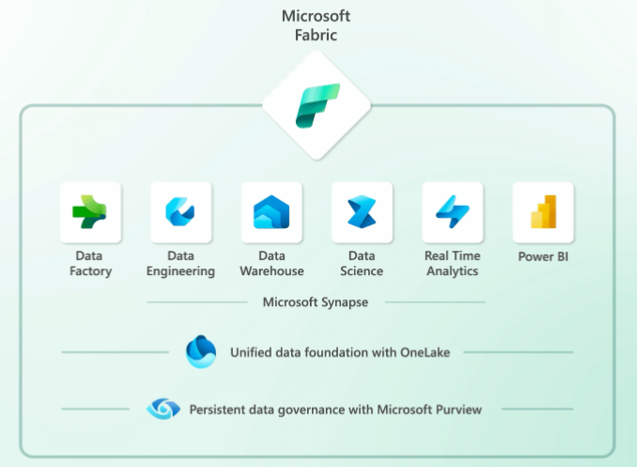
Microsoft Fabric is a new data platform that integrates various data and analytics tools, such as Azure Data Factory, Azure Synapse Analytics, and Power BI. It enables data professionals to build end-to-end analytics solutions with a unified experience and architecture. In this blog post, we will explore what’s new in Microsoft Fabric and how it differs from Synapse Studio.

Microsoft Fabric

Synapse Studio is a web-based user interface that allows users to manage and develop various Synapse resources, such as data pipelines, SQL pools, Spark pools, notebooks, and more. Synapse Studio is still available as a standalone product, but it is also integrated into Fabric as one of the role-specific experiences.

MS Fabric offers several advantages over Synapse Studio, such as:

  • A single sign-up and sign-in process that gives users access to all the Fabric features and services within seconds.
  • A seamless integration of Power BI for data visualization and reporting, as well as Azure OpenAI Service for generative AI and language modeling.
  • A simplified collaboration across different roles and teams, with features like semantic link, shared workspaces, and code repositories.
  • A built-in MLFlow model and experiment tracking powered by Azure Machine Learning, as well as SynapseML Spark library for scalable machine learning.
  • A support for open Delta Lake format that allows users to version datasets and create reproducible machine learning code.

Microsoft Fabric is designed to be the data platform for the era of AI, where data science and machine learning are essential for unlocking the value of data. By using MS Fabric, users can easily enrich their data with predictive insights and create organization-specific AI experiences. To learn more about MS Fabric and how to get started, visit https://fabric.microsoft.com.

Rest API using Azure Functions

To create a REST API using Azure Functions, you will need to create a new Azure Functions app and set up HTTP triggers for the functions that you want to expose as API endpoints.

Here is a general outline of the steps you can follow to create a REST API using Azure Functions:

  1. Sign in to the Azure portal and create a new Azure Functions app.
  2. In the Azure Functions app, create a new function. You can choose the HTTP trigger template to create a function that is triggered by an HTTP request.
  3. In the function’s code, specify the HTTP method (GET, POST, PUT, DELETE, etc.) that the function should respond to, and define the logic for handling the request and generating the response.
  4. Test the function by making HTTP requests to the function’s URL using a tool like Postman.
  5. Repeat steps 2-4 for each API endpoint that you want to create.
  6. To secure the API, you can use Azure AD authentication or a custom authentication solution like API keys.

Here is an example of how you can create a REST API using Azure Functions in Python and implement the GET, POST, DELETE, and PUT methods:

import logging
import azure.functions as func

def main(req: func.HttpRequest) -> func.HttpResponse:
    logging.info('Python HTTP trigger function processed a request.')

    if req.method == "GET":
        # Handle GET request
        name = req.params.get('name')
        if name:
            return func.HttpResponse(f"Hello {name}!")
        else:
            return func.HttpResponse(
                 "Please pass a name on the query string",
                 status_code=400
            )
    elif req.method == "POST":
        # Handle POST request
        try:
            req_body = req.get_json()
        except ValueError:
            return func.HttpResponse(
                 "Invalid request body",
                 status_code=400
            )
        else:
            name = req_body.get('name')
            if name:
                return func.HttpResponse(f"Hello {name}!")
            else:
                return func.HttpResponse(
                     "Please pass a name in the request body",
                     status_code=400
                )
    elif req.method == "DELETE":
        # Handle DELETE request
        return func.HttpResponse("Deleted successfully", status_code=200)
    elif req.method == "PUT":
        # Handle PUT request
        return func.HttpResponse("Updated successfully", status_code=200)
    else:
        return func.HttpResponse(
             "Invalid request method",
             status_code=405
        )

This function is an HTTP trigger that responds to GET, POST, DELETE, and PUT requests. The GET and POST methods expect a name parameter in the query string or request body, and return a greeting message with the name. The DELETE and PUT methods return a success message. If the name parameter is not provided, the GET and POST methods return an error message. If an invalid request method is used, the function returns an error message.

To test this function, you can use a tool like Postman to send HTTP requests to the function’s URL with the appropriate method. For example, to test the GET request, you can use the following URL:

https://your-function-app.azurewebsites.net/api?name=John

Replace your-function-app.azurewebsites.net with the actual URL of your Azure Functions app

Azure Function Python Developer Guide