Change Integration Runtime Key

This blog post provides instructions for changing the key for a self-hosted integration runtime, applicable when connecting an existing client to a new Azure Data Factory or Synapse Analytics. The process begins by opening PowerShell as an Administrator and setting the execution policy to unrestricted. After pressing enter, navigate to the Microsoft Integration Runtime directory and execute the RegisterIntegrationRuntime.ps1 script with the new integration runtime key. Upon successful registration, verify the integration runtime status in the Data Factory. To complete the process, restore the execution policy to restricted and exit PowerShell. This procedure ensures the client is properly linked to the new data management service.

  1. Open PowerShell as an Administrator.
  2. Type Set-ExecutionPolicy Unrestricted.
  3. Press Enter.
  4. Go to “C:\Program Files\Microsoft Integration Runtime\3.0\PowerShellScript\RegisterIntegrationRuntime.ps1”
  5. Execute command “.\RegisterIntegrationRuntime.ps1 – gatewayKey <Key from new IR>". It should execute with status “Integration Runtime registration is successful!”
  6. Validate Integration runtime status in Data factory
  7. Once finished, type Set-ExecutionPolicy Restricted.
  8. Press Enter.
  9. Type Exit.

Get Azure Key Vault secrets in Fabric pipeline

In this comprehensive guide, we delve into the integration of Fabric Data Factory with Azure Key Vault, emphasizing the streamlined access to Key Vault secrets using service principal authentication.

This blog post provides a detailed walkthrough on configuring web activity with service principal authentication, ensuring secure access to sensitive information stored in Key Vault.

This step-by-step tutorial includes setting up a fabric data factory connection and configuring Web Activity in Azure Data Factory for secure communication with Azure key vault. By prioritizing Azure Data Factory and Key Vault integration, this post aims to equip readers with the knowledge to fortify their cloud data management and security frameworks effectively.

Prerequisites

To get started, you must complete the following prerequisites:

Add a Web activity to a pipeline with UI

To use a Web activity in a pipeline, complete the following steps:

Create the activity

  1. Create a new pipeline in your workspace.
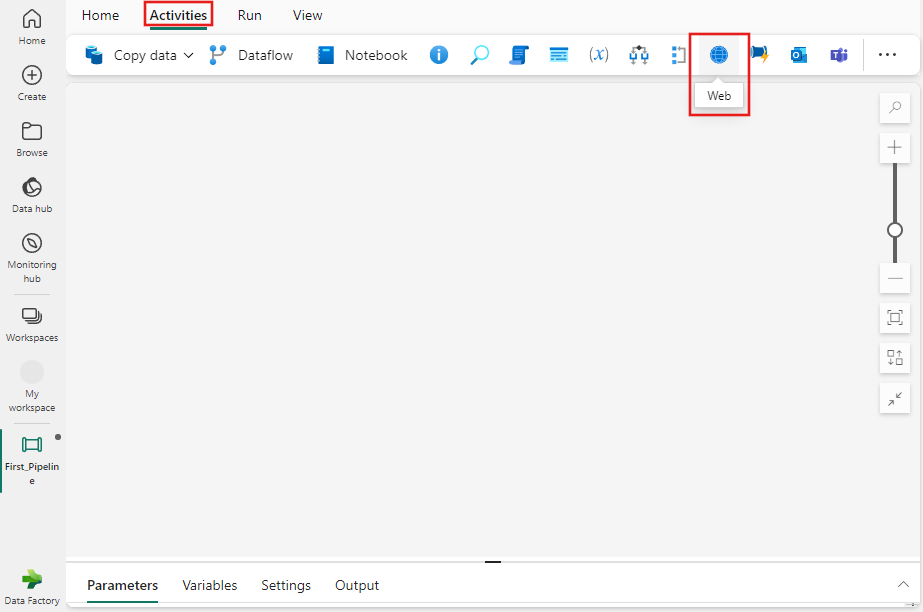
  2. Search for Web in the pipeline Activities pane, and select it to add it to the pipeline canvas.


Web activity settings

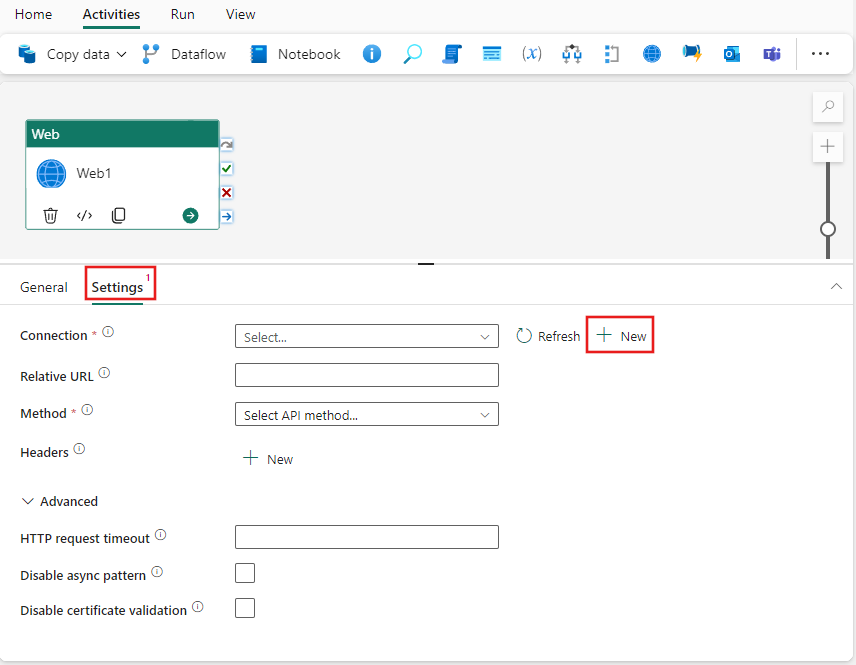
  • Select the Settings tab, select an existing connection from the Connection dropdown, or use the + New button to create a new connection, and specify its configuration details.

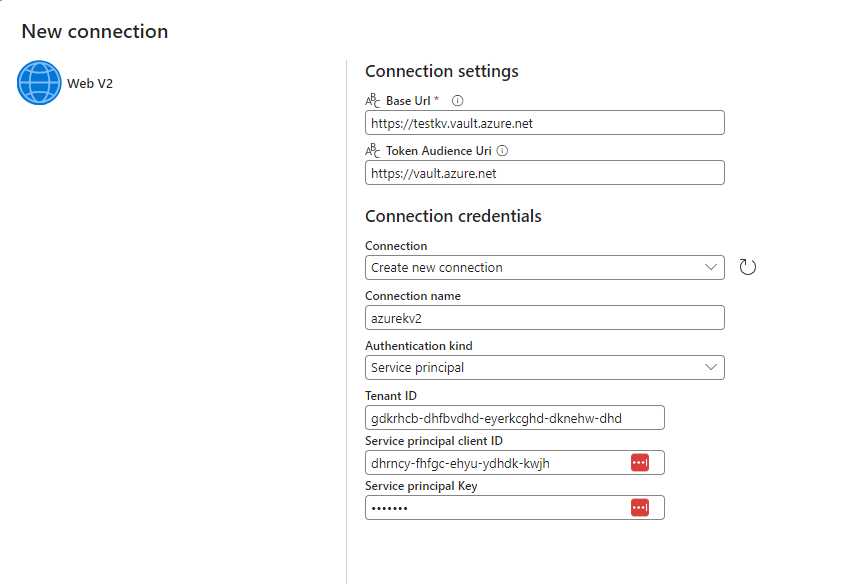
  • When you choose + New to create a new connection, you see the connection creation dialog where you can provide the base URL and credentials to connect.
  • Save connection and add relative secret path and method in web activity settings

Save and run or schedule the pipeline

Work with Binary Data in Synapse Lookup Activity

Introduction:

When working with binary data in Synapse Lookup activity, you may encounter an error message stating that the data type ByteArray is not supported. This limitation can be frustrating, but there is a simple workaround to handle binary data effectively in the Lookup activity. In this blog post, we will explore how to convert ByteArray to NVARCHAR within the Lookup activity and then convert it back to ByteArray for further processing.

Summary:

By default, the Synapse Lookup activity does not support the ByteArray data type, which can lead to errors when working with binary data. However, you can overcome this limitation by converting the ByteArray data to NVARCHAR within the Lookup activity. After performing the lookup, you can convert the NVARCHAR data back to ByteArray for subsequent processing.

Converting ByteArray to NVARCHAR: To convert ByteArray to NVARCHAR within the Lookup activity, you can use the following script:

CONVERT(NVARCHAR(MAX), CONVERT(VARBINARY(MAX), [timestamp]), 1) AS varchartstamp

This script converts the ByteArray column, such as [timestamp], to NVARCHAR using the CONVERT function. The result is stored in the variable varchartstamp.

Converting NVARCHAR back to ByteArray: To convert NVARCHAR back to ByteArray after the Lookup activity, you can use the following script:

CONVERT(timestamp, CONVERT(varBINARY(MAX), @{activity('Lookup1').output.firstRow.varchartstamp}, 2))

This script converts the NVARCHAR variable, varchartstamp, back to ByteArray using the CONVERT function. The result is a ByteArray that can be used for further processing.

Conclusion:

Working with binary data in Synapse Lookup activity can be challenging due to the lack of direct support for the ByteArray data type. However, by leveraging the conversion functions within the Lookup activity, you can easily convert ByteArray to NVARCHAR and vice versa. This enables seamless integration of binary data into your Synapse pipelines, opening up a wide range of possibilities for data processing and transformation.

By implementing these conversion scripts, you can effectively handle binary data in Synapse Lookup activity and achieve your data integration goals. With this workaround, you can overcome the limitations and take full advantage of the power of Synapse Analytics.

Note: Ensure that the appropriate conversions and validations are performed based on your specific requirements and data scenarios