This blog post provides instructions for changing the key for a self-hosted integration runtime, applicable when connecting an existing client to a new Azure Data Factory or Synapse Analytics. The process begins by opening PowerShell as an Administrator and setting the execution policy to unrestricted. After pressing enter, navigate to the Microsoft Integration Runtime directory and execute the RegisterIntegrationRuntime.ps1 script with the new integration runtime key. Upon successful registration, verify the integration runtime status in the Data Factory. To complete the process, restore the execution policy to restricted and exit PowerShell. This procedure ensures the client is properly linked to the new data management service.
Open PowerShell as an Administrator.
Type Set-ExecutionPolicy Unrestricted.
Press Enter.
Go to “C:\Program Files\Microsoft Integration Runtime\3.0\PowerShellScript\RegisterIntegrationRuntime.ps1”
Execute command “.\RegisterIntegrationRuntime.ps1 – gatewayKey <Key from new IR>". It should execute with status “Integration Runtime registration is successful!”
Validate Integration runtime status in Data factory
Once finished, type Set-ExecutionPolicy Restricted.
Microsoft Azure Synapse Link is a powerful tool that allows you to seamlessly integrate your Azure Synapse Analytics workspace with dataverse. However, like any technology, it can encounter issues during configuration and usage. In this blog post, we’ll address a common problem that users encounter when setting up Synapse Link: tables going into an initial sync and eventually failing, with Spark applications getting canceled. We’ll discuss how to troubleshoot this issue and provide a resolution to get your Synapse Link up and running smoothly.
Problem Statement
After configuring Synapse Link, you may notice that your tables are going through an initial synchronization process, but then they fail. Furthermore, when you check the Synapse monitoring, Spark applications are shown as being in a canceled state, and no logs are created for these jobs. This can be frustrating, but there are reasons behind this issue and steps to resolve it.
Synapse Link ErrorCanceled Spark Application
Troubleshoot:
The primary reason for tables failing during the initial sync and Spark applications getting canceled is related to the available resources in your Synapse workspace. Here are some troubleshooting steps to identify the problem
Inadequate Cores: Your Synapse workspace might not have the required number of cores available to process Synapse Link tables effectively. To find out if this is the issue, you can review your Azure Synapse Analytics available cores.
Spark Pool Minimum Requirement: The minimum requirements for a Spark pool in Synapse Link can also lead to this problem. You should check whether your Spark pool configuration meets these requirements.
Minimum requirement for spark pool
Resolution
To resolve the issue and ensure a smooth operation of Synapse Link, you need to make sure that your Synapse workspace has the necessary resources available. Here’s how you can do it:
Spark Cluster Nodes: Synapse Link needs a Spark cluster with 5-10 Spark nodes. If the size of one Spark node is (4 vCores / 32 GB), then your workspace should have 40 total vCores available to process Synapse Link tables effectively. Ensure that your workspace meets this requirement.
Increase Spark Cores: If your Synapse environment falls short of the required number of cores, you can increase the number of Spark cores. To do this, open a support ticket with Microsoft (MSFT) and request an increase in the Spark cores for your environment.
Reference
For more information and detailed recommendations on Spark pool configuration for Azure Synapse Link, you can refer to the official Microsoft documentation here.
In this blog post, we will discuss a common issue encountered when trying to access partitioned tables in Azure Synapse Workspace, specifically those created by ingesting tables from Power Platform through Azure Synapse Link for Dataverse. While the snapshot folder and .csv files are typically generated, users face difficulties in accessing these partitioned tables. The problem is characterized by an error message that reads: “Invalid object name ‘dataverse_********.dbo.opportunity_partitioned’.”
Resolution:
Check if Workspace System Assigned Managed identity has Storage Blob Data Contributor access on the Storage Account.
Create a server-scoped credential on the master database for the storage account and container
Partition table should work after creating server-scoped credentials
USE MASTER CREATE CREDENTIAL [https://storageaccount.dfs.core.windows.net/container] WITH IDENTITY=’Managed Identity’
Error “Failed to list resources” can occur while adding role assignment in Synapse workspace. This error can happen if admin assigning permission is a guest account.
User object id can be used to assign permission instead of AD principal name. This post go through steps to get user profile id as well.
Error: Failed to list resources
This error can occur while trying to add role assignment in synapse workspace.
Failed to list resource (Synapse Workspace)
Resolution
Object id can be used to assign permission incase “failed to list resources” error occurs, while assigning permissions using AD principal name.
Retrieve AD user object id using one of the following methods
Method 1
Open Azure CLI
Run following cli command to get object ID
Go to “synapse workspace -> Manage -> Access Control” and use object id to add role assignment
--azure cli command
az ad user show --id user@azurecloud.com
Response
Azure CLI
Method 2
In Azure cloud console, go to resource group then “Access control (IAM)”
Open role assignment
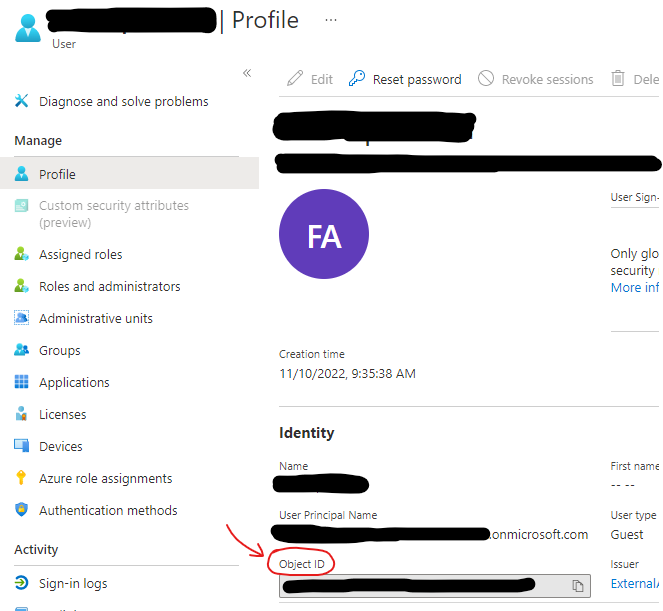
Find account that need synapse workspace permissions
Click on user profile to view object id
Go to “synapse workspace -> Manage -> Access Control” and use object id to add role assignment