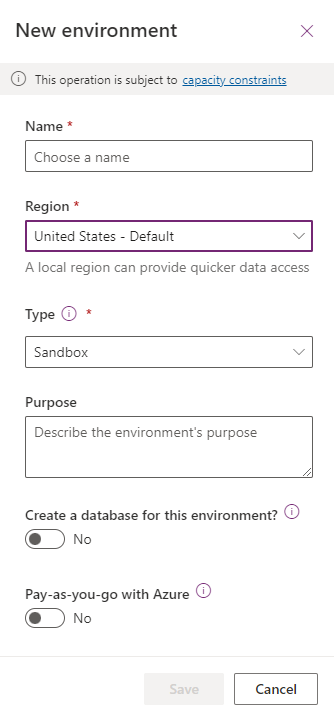
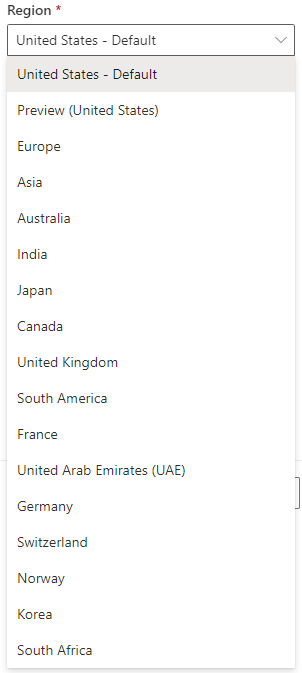
When we create new power app environment, we can select region from a drop down. We have option to select United States as region, but we can’t decide if this environment will be in East US or West US.
Power app environment data center location (i.e. East, West) is automatically decided by Microsoft based upon the tenant configuration.
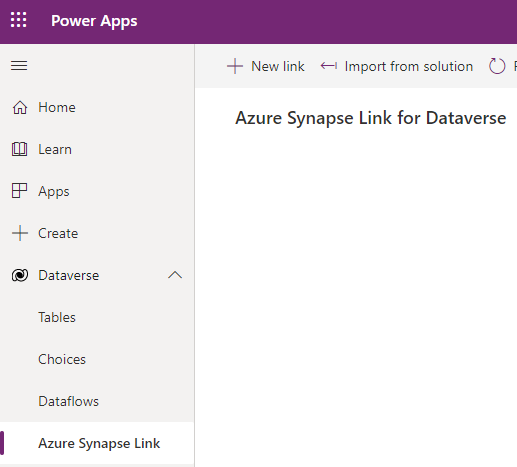
This post go through steps to find out environment data center location e.g. East US or West US. This information is useful while setting up azure resources for synapse link for dataverse.
Go to link to find out steps to create new environment
Go to link find more information about synapse link for dataverse
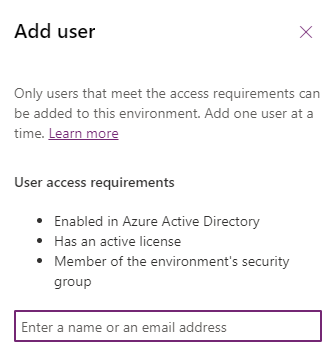
Go to link to find steps to create new power platform user
Error “Failed to list resources” can occur while adding role assignment in Synapse workspace. This error can happen if admin assigning permission is a guest account.
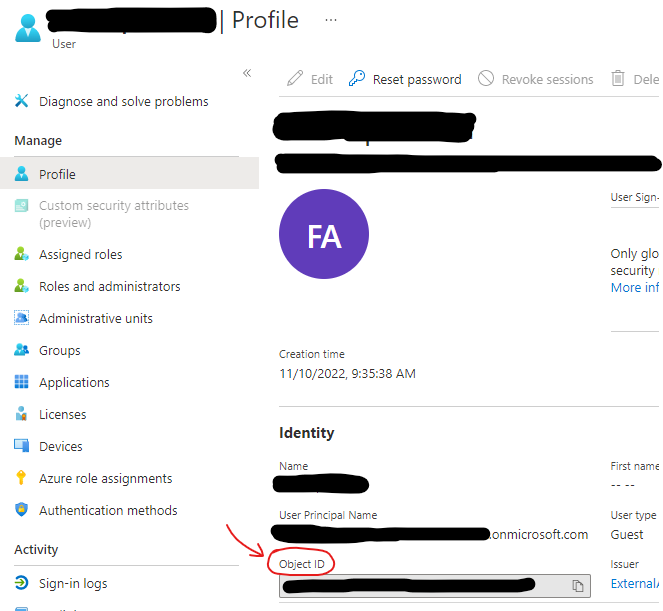
User object id can be used to assign permission instead of AD principal name. This post go through steps to get user profile id as well.
Error: Failed to list resources
This error can occur while trying to add role assignment in synapse workspace.
Failed to list resource (Synapse Workspace)
Resolution
Object id can be used to assign permission incase “failed to list resources” error occurs, while assigning permissions using AD principal name.
Retrieve AD user object id using one of the following methods
Method 1
Open Azure CLI
Run following cli command to get object ID
Go to “synapse workspace -> Manage -> Access Control” and use object id to add role assignment
--azure cli command
az ad user show --id user@azurecloud.com
Response
Azure CLI
Method 2
In Azure cloud console, go to resource group then “Access control (IAM)”
Open role assignment
Find account that need synapse workspace permissions
Click on user profile to view object id
Go to “synapse workspace -> Manage -> Access Control” and use object id to add role assignment
Un-check “Support only Azure Active Directory Authentication for this workspace”
Azure Active Directory Authentication
Create SQL Login and User
Log into SQL on-demand pool using SQL Server Management Studio. Use Admin Credentials for this step, as we will create SQL user in next step.
Create new SQL Login “DBUser”. Give this new user access on required data base using following script.
Database Login
--use following script to create DB user and give reader permissions
USE database
GO

CREATE USER [DBUser] FOR LOGIN [DBUser] WITH DEFAULT_SCHEMA=[dbo]
GO

ALTER ROLE db_datareader ADD MEMBER [DBUser]
GO
SQL User Permission to Run Server less Query
Use following script to create Database scoped credentials and data source. This data source will be used by SQL user to run server less query. Behind the scene Managed identity is going to be used for storage location access.
Replace database name and Storage location with your required values. Also use admin user to run following scripts.
CREATE MASTER KEY ENCRYPTION BY PASSWORD = 'abcd1234'
GO

CREATE DATABASE SCOPED CREDENTIAL SynapseIdentity
WITH IDENTITY = 'Managed Identity';

GRANT REFERENCES ON DATABASE SCOPED CREDENTIAL::[SynapseIdentity] TO [DBUser];


CREATE EXTERNAL DATA SOURCE mysample
WITH (    LOCATION   = 'https://test.blob.core.windows.net/curatedzone/',
          CREDENTIAL = SynapseIdentity
)

SELECT TOP 10 * FROM OPENROWSET(BULK 'ACCOUNTENTRY/', DATA_SOURCE = 'mysample', FORMAT='DELTA') as rows;
Synapse Analytics SQL Authentication- Test Server Less Query
Log into synapse on demand pool with Synapse SQL User
Run Server less query using Data Source created in above step. Server less query should execute successfully.
SELECT TOP 10 *
FROM OPENROWSET(BULK 'ACCOUNTENTRY/', DATA_SOURCE = 'mysample', FORMAT='DELTA') as rows;
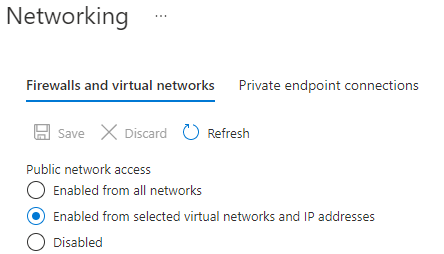
By default, the ADLS storage account that is configured for either F&O Export to Data Lake or Synapse Link for Dataverse must have Blob public access Enabled. Following steps can be used to Disable Public Access on D365 Export to Data Lake.
1. Provision the ADLS storage account to a different region than the DV/F&O environment. The region must be different because services that are deployed in the same region as the storage account use private Azure IP addresses for communication. You cannot restrict access to Azure services based on their public outbound IP address range.
2. Disable Public Access on D365 Export to Data Lake: Disable blob public access on the ADLS storage account and set option to allow access from selected IP addresses.
3. Run the following script to generate the list of IP addresses of the underlying Power Platform services that require access. These services are all tagged with PowerPlatformInfra.
((Get-AzNetworkServiceTag -location <region of Dynamics environment>).Values | Where-Object {$_.Name -iin "PowerPlatformInfra.<region of Dynamics environment>"}).Properties.AddressPrefixes
4. Build another script to insert the list of allowable IP addresses generated by #3 into the storage account IP address exceptions using the following:
Right-click https://dl.google.com/cloudsql/cloud_sql_proxy_x64.exe and select Save Link As to download the Cloud SQL Auth proxy. Rename the file to cloud_sql_proxy.exe. Place the executable (.exe) file in newly create Folder in Step 1.
Step 3– .bat File
Paste following command in notepad and save it as a batch file (.bat). Place bat file in Directory created in Step 1
cd C:\CloudProxy\
cloud_sql_proxy -instances=dev-data:us-central1:sql2017=tcp:1425 -credential_file=dev-data-svc.json
Pause
Above command requires instance and credential_file parameters.
Instance: Get Cloud SQL Instance name by going into Google Cloud Console and then into SQL to list all instances. Get Instance Connection Name of the required Instance. Highlighted column in following snapshot contains Instance connection name.
SQL Instance Connection Name
Credential_File: This is the credential file name that contains Google Cloud Service account used for Connection.
Follow this link for steps to generate Service Account Json key File. Service account should have “cloudsql.instances.connect” permissions for a successful connection.
Place Json key file in directory created in Step 1
Step 4– VBScript
Create VBScript file and Place it in directory created in Step 1. VBScript file should have following commands.
Set WshShell = CreateObject("WScript.Shell")
WshShell.Run chr(34) & "C:\CloudProxy\cloudSQL.bat" & Chr(34), 0
Set WshShell = Nothing
After Step 4 “C:\CloudProxy\” Directory should have following files.
Step 5 – Scheduler Task
Open Windows Task Scheduler
Create a new folder
Create Basic Task in the new Folder
Set Trigger as Highlighted Below
Set Action as below
Browse to Directory Created in Step 1 and select VBScript File
Verify Task Details and Finish Setup
New Windows Scheduler Task setup is now completed. This task should start automatically on windows startup.
Note: Account that is running this task should have script execution permissions.
Home buying process can be confusing specially for first time home owner. You can come across a lot of new terminologies during home buying experience. This post contains high level checklist of main steps involved in this process and also summarizing some of the terms and meaning of those for the First Time Home Owner.
Home Buying Check List?
High level list of Activities and Stages of Home Buying Process for First Time Home Owner.
Cleanup Your Credit (Pay Your Bills , Avoid New Accounts and Big Purchase)
A mortgage is an agreement between you and a lender that allows you to borrow money to purchase or refinance a home and gives the lender the right to take your property if you fail to repay the money you’ve borrowed
What is Home Mortgage or Financing?
A home mortgage is a loan given by a bank, mortgage company or other financial institution for the purchase of a residence—either a primary residence, a secondary residence, or an investment residence—in contrast to a piece of commercial or industrial property. In a home mortgage, the owner of the property (the borrower) transfers the title to the lender on the condition that the title will be transferred back to the owner once the final loan payment has been made and other terms of the mortgage have been met.
Prequalification is an early step in your homebuying journey. When you prequalify for a home loan, you’re getting an estimate of what you might be able to borrow, based on information you provide about your finances, as well as a credit check.
What is Pre-Approval?
A mortgage Pre-Approval is a letter from a lender indicating the type and amount of loan you can qualify for. The preapproval letter is issued after the lender has evaluated your financial history, including pulling your credit report and score. Getting preapproved also helps you find a mortgage lender that can work with you to select a home loan with an interest rate and other terms suited to your needs.
Pre Approval Benefits:
Show real estate agents that you’re serious
Place strong offers on properties that you’re interested in
Show potential sellers that you’re serious and financially eligible
Fixed vs adjustable Payment Type?
Fixed-Rate Mortgage
Adjustable-Rate Mortgage
Consistent interest rate for the entire loan term
Lower interest rates at the beginning of the loan
Easy to budget for (monthly payments are always the same)
There’s a chance interest rates could decrease later on
Good for long-term homeowners
Good for short-term homeowners
No prepayment penalties
What is Earnest Money?
When you find a home and enter into a purchase contract, the seller may withdraw the house from the market. Earnest money or good faith deposit, is a sum of money you put down to demonstrate your seriousness about buying a home.
You deliver the amount when signing the purchase agreement or the sales contract. This Money is going to be counted toward the Down Payment on Closing.
What is Property Appraisal?
Real estate appraisal or property valuation is the process of developing an opinion of value for real property. This is an estimate of price for your property in the current market.
What is Closing?
The final stage in your home buying journey will be to close on your new home and obtain a free and clear title to the property. Obtaining Title Ensures that no other person, organization, or government has any legal or financial claim that would limit ownership rights.
To obtain this title, you pay a title company or title attorney to examine the public record for any outstanding claims against the property and provide title insurance to protect your investor’s interest in the property. The closing itself and signing of paperwork typically takes 1-2 hours.
Other Questions you may be Asked?
You may come across following term during Mortgage stage of home buying process. Mortgage company may ask you following question. Either you falls into these categories or not, it is better to understand what these terms means.
Do you have any judgements or liens against you?
Have you had any foreclosures in the last 7 years?
Have you had any short sales in the last 4 years
Have you filed for bankruptcy in the last 7 years?
What is Judgement?
A judgment occurs when the creditor wins their case against you in court. It allows the creditor to pursue ways to recoup the debt you owe e.g. by placing a Lien on your real estate. A judgment could be filed against you in several ways.
You fail to show up in court
The debt is legally yours
What is Property Lien?
A creditor can place a lien on your real estate holdings. The creditor notifies lenders of the lien. Therefore, if you sell your property or try to transfer the property, you would need to satisfy the debt first. A lien against property can be automatic in New York when a judgment is obtained in the county in which the judgment is recorded.
What is Foreclousure?
Foreclosure is the legal process by which a lender attempts to recover the amount owed on a defaulted loan by taking ownership of the mortgaged property and selling it.
Creditor or Lender?
A creditor or lender is a person or institution to whom money is owed. The first party, in general, has provided some property or service to the second party under the assumption that the second party will return an equivalent property and service.
What is Short Sales?
A short sale occurs when you sell stock you do not own. Investors who sell short believe the price of the stock will fall. If the price drops, you can buy the stock at the lower price and make a profit. If the price of the stock rises and you buy it back later at the higher price, you will incur a loss.
With a fixed-rate mortgage, you get a set interest rate and payment for the entire loan term. Adjustable-rate mortgages, on the other hand, have rates that can change over time.
What is Bankruptcy?
Bankruptcy is a legal proceeding involving a person or business that is unable to repay their outstanding debts. The bankruptcy process begins with a petition filed by the debtor, which is most common, or on behalf of creditors, which is less common. All of the debtor’s assets are measured and evaluated, and the assets may be used to repay a portion of the outstanding debt.